A few weeks ago, I dropped my new camera, a Canon SD850 IS, on the sidewalk, and cracked the LCD. The camera still worked - you could still take pictures - but the LCD screen was solid white with obvious cracks in it.After doing some research, I turned up a few options for fixing it. Most useful was a long-lived thread (http://photography-on-the.net/forum/showthread.php?t=7839&pp=20) detailing a number of people's experience with replacing LCD screens on their own. Another option was The Foto Geeks, who will repair the LCD for you, or sell you a replacement LCD. My first plan was to just ship them the camera for repair, but my inner geek got the best of me. I ordered the replacement LCD screen (CM1-4030) in order to do the replacement myself.
I searched a bit further trying to find someone's write-up of repairing an SD850, but all the write-ups I could find were for different models (SD400, SD600). Undaunted, I forged ahead.
Step 1: Remove the battery.
Just to be safe.
Step 2: Open the case.
There are 7 screws you'll need to remove in order to get at the LCD screen:
- Two on the left hand side of the camera (as you're looking at the LCD, not the lens)
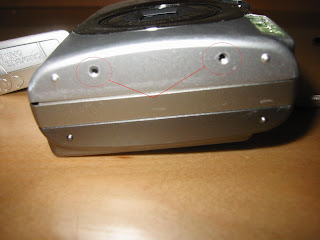
- Two on the bottom of the camera
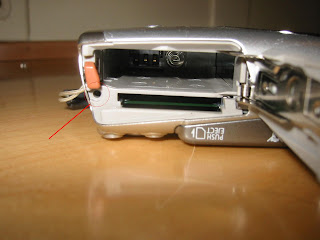
- One inside the battery compartment
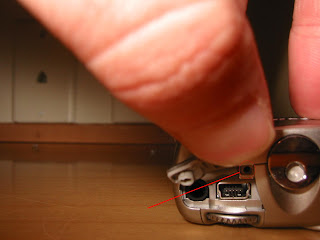
- One inside the A/V plug section
- One underneath the loop for the wrist strap (this one is tricky).
You won't really be able to get to the last screw until you start getting the front cover off the camera. Unscrew the first six and set them aside (note that at least the battery compartment screw is a different length). I kept the battery compartment door open, but not sure if this was really necessary.
I used a small, slotted screwdriver to gently try to pop open the case. The write-ups for other camera models made it seem like the workings were attached to the front cover, and the back would just pop off. Not for the SD850 - first, you've got to work the front of the camera loose a bit. Then you'll be able to get to the screw underneath the wrist strap loop. Note that something holds the front cover to the inner working of the camera -
do not try to pull it completely off.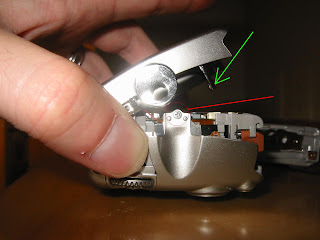
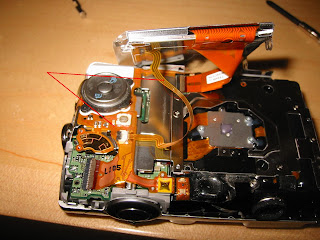
I don't have much advice for getting the cover off - there are clearly tabs at the top that hold things together, so just go slow and be careful. One thing that was very tough, though, was a long arm underneath the wrist strap loop. I had to grab the wrist strap loop and pull sideways away from the camera to work this arm loose - see the green arrow here.
Once you've got that last screw out, it's time to work on getting the back cover off. I found it helpful to put one of the bottom screws back in to hold the front cover on.
Step 3: Remove the damaged LCD
Once you've got the back cover off, you'll have access to the LCD. There are three screws to remove in order to take out the retaining clip. The one in the top left was extremely hard to remove, as the head was very shallow. After removing those screws, you should be able to remove the retaining clip that holds the screen down. There's a second small part of the clip on the right of the LCD that came loose for me as well.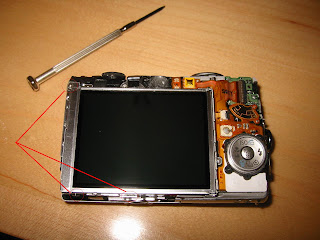
Unlike the other models, with the SD850, the backlight and LCD are a single assembly, so no worries about separating the two. You'll need to slide the LCD to the left a bit to get it out from under a tab in the top right of the housing. I made the mistake of just pulling out the two ribbon cables, but what you should do is lift the clips that lock them in place. For the large cable, slide a small slotted screwdriver over the ribbon cable, into the clip and lift up. For the small cable, slide the screwdriver into the back of the clip (opposite the ribbon cable) and lift up. Remove the damaged LCD.
Step 4: Connect the new LCD screen.
Reverse the steps above to connect the two ribbon cables. Pull the LCD a bit to the left, slide under the tab in the top right of the housing, and press down to seat it into place. Replace the two parts of the retaining clip, and screw it back down.
At this point, you should theoretically be able to
put the battery in, power up, and test. I tried, but was unable to trigger the power button.
Step 5: Close up the case.
This was actually a lot harder than I expected. If you screwed the front cover back on, remove  those screws at this point, and re-loosen the front cover. Start working the back cover back into place, taking care with the tabs on the top of the camera. There's one tab, right near the shutter control, that has two stops - you'll need to lift it past the first stop to get all the way in. Screw in the under-the-wrist-strap-loop screw.
Work the front cover back into place, which should snap into those clips on the top of the camera. Put all the screws back in, and you're done!


