Adult-proofing big wheels
One of my favorite annual San Francisco events is Bring Your Own Big Wheel, a big wheel "race" down a steep, winding road (Vermont St in SF's Potrero Hill neighborhood). Last year, my friend Dave and I rode in the race, and learned some lessons about how badly a stock Big Wheel handles aggressive riding by an adult. Fortunately, some simple modifications and reinforcement can make a dramatic difference.
Mod #1: Remove the pedals

Pedaling a big wheel as an adult is just not effective - you're better off pushing with your feet. In fact, the pedals are most likely just going to smack you in the shins. For the SF course, they're even more of a liability, as the pedals will hit the ground on sharp turns and lift the front wheel up in the air, eliminating what little steering you had.
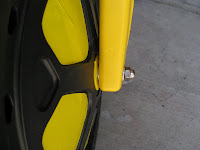
Instead, I recommend just putting a bolt through the front wheel, with a cap nut on the other end. Unfortunately, I didn't write down the proper length and size, but it shouldn't be hard to find them. I put washers on either side of each prong of the fork, and used loc-tite on the cap nut to make sure it holds together.
Mod #2: Tighter steering

The handlebar setup for big wheels is just not meant for aggressive steering - the plastic buckles easily, and the screw attaching the handlebars to the fork starts tearing up the plastic. The end result looks like this:
In an emergency, you can just wedge something in the gap between fork and handlebar (we used torn strips of cardboard during the race last year), but that's not going to last.
What I ended up doing was picking up a pair of L brackets like these, to effectively stiffen up the fork. Go for thin ones, since there's not a lot of wiggle room between the fork and handlebars. First, attach the L brackets to the fork as shown here.


A few notes on this:
- It's unlikely you'll be able to remove the fork from the main body of the big wheel with the L brackets on.
- Depending on where you originally screwed in the handlebars, you can try to re-use the original holes in the fork. Make sure you use shorter screws, though - not the long ones that come with the big wheel.
- I recommend putting a screw in all four sides.
The L brackets should pick up most of the pressure for turning the handlebars, such that the
 handlebar screws are just there to keep the handlebars from sliding up off the bracket. However, I found that putting a second pair of screws in helps it hold a bit tighter. I recommend drilling small pilot holes for the extra screws - 3/32" for use with #10 screws.
Unfortunately, my street isn't really steep enough to stress-test this new setup, so I'll have to wait until next week to see how it holds up.

1 Comments:
Groundbreaking. This is surely the foremost treatise on reinforcing a child's plastic bike for the purposes of lunacy.
Post a Comment
Subscribe to Post Comments [Atom]
<< Home