Replacing the LCD on a Canon SD850 IS
A few weeks ago, I dropped my new camera, a Canon SD850 IS, on the sidewalk, and cracked the LCD. The camera still worked - you could still take pictures - but the LCD screen was solid white with obvious cracks in it.
After doing some research, I turned up a few options for fixing it. Most useful was a long-lived thread (http://photography-on-the.net/forum/showthread.php?t=7839&pp=20) detailing a number of people's experience with replacing LCD screens on their own. Another option was The Foto Geeks, who will repair the LCD for you, or sell you a replacement LCD. My first plan was to just ship them the camera for repair, but my inner geek got the best of me. I ordered the replacement LCD screen (CM1-4030) in order to do the replacement myself.
I searched a bit further trying to find someone's write-up of repairing an SD850, but all the write-ups I could find were for different models (SD400, SD600). Undaunted, I forged ahead.
Step 1: Remove the battery.
Just to be safe.
Step 2: Open the case.
There are 7 screws you'll need to remove in order to get at the LCD screen:
- Two on the left hand side of the camera (as you're looking at the LCD, not the lens)
- Two on the bottom of the camera
- One inside the battery compartment
- One inside the A/V plug section
- One underneath the loop for the wrist strap (this one is tricky).
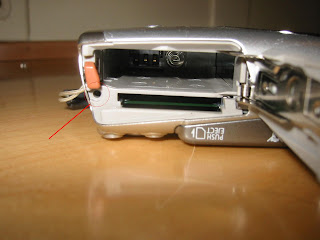
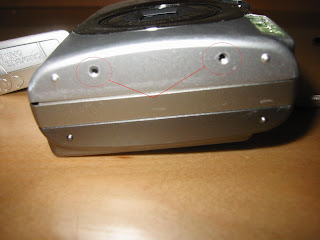
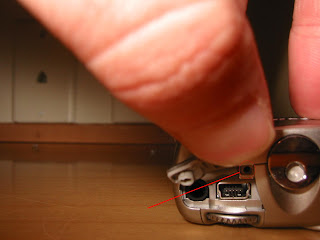 You won't really be able to get to the last screw until you start getting the front cover off the camera. Unscrew the first six and set them aside (note that at least the battery compartment screw is a different length). I kept the battery compartment door open, but not sure if this was really necessary.
I used a small, slotted screwdriver to gently try to pop open the case. The write-ups for other camera models made it seem like the workings were attached to the front cover, and the back would just pop off. Not for the SD850 - first, you've got to work the front of the camera loose a bit. Then you'll be able to get to the screw underneath the wrist strap loop. Note that something holds the front cover to the inner working of the camera - do not try to pull it completely off.
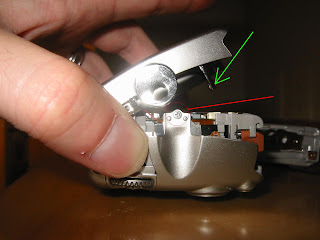 I don't have much advice for getting the cover off - there are clearly tabs at the top that hold things together, so just go slow and be careful. One thing that was very tough, though, was a long arm underneath the wrist strap loop. I had to grab the wrist strap loop and pull sideways away from the camera to work this arm loose - see the green arrow here.
Once you've got that last screw out, it's time to work on getting the back cover off. I found it helpful to put one of the bottom screws back in to hold the front cover on.
Step 3: Remove the damaged LCD Step 4: Connect the new LCD screen.
Once you've got the back cover off, you'll have access to the LCD. There are three screws to remove in order to take out the retaining clip. The one in the top left was extremely hard to remove, as the head was very shallow. After removing those screws, you should be able to remove the retaining clip that holds the screen down. There's a second small part of the clip on the right of the LCD that came loose for me as well.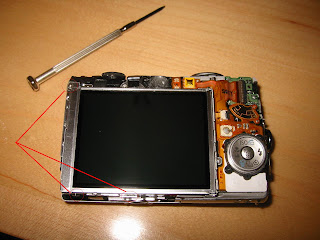
Unlike the other models, with the SD850, the backlight and LCD are a single assembly, so no worries about separating the two. You'll need to slide the LCD to the left a bit to get it out from under a tab in the top right of the housing. I made the mistake of just pulling out the two ribbon cables, but what you should do is lift the clips that lock them in place. For the large cable, slide a small slotted screwdriver over the ribbon cable, into the clip and lift up. For the small cable, slide the screwdriver into the back of the clip (opposite the ribbon cable) and lift up. Remove the damaged LCD.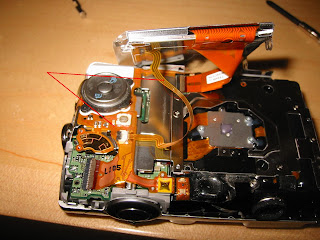
Reverse the steps above to connect the two ribbon cables. Pull the LCD a bit to the left, slide under the tab in the top right of the housing, and press down to seat it into place. Replace the two parts of the retaining clip, and screw it back down.
At this point, you should theoretically be able to
put the battery in, power up, and test. I tried, but was unable to trigger the power button.
Step 5: Close up the case.
This was actually a lot harder than I expected. If you screwed the front cover back on, remove  those screws at this point, and re-loosen the front cover. Start working the back cover back into place, taking care with the tabs on the top of the camera. There's one tab, right near the shutter control, that has two stops - you'll need to lift it past the first stop to get all the way in. Screw in the under-the-wrist-strap-loop screw.
Work the front cover back into place, which should snap into those clips on the top of the camera. Put all the screws back in, and you're done!
27 Comments:
thanks for the writeup! no doubt this will help people. I hope these instructions work on the 870 as well
From comparing my experience to people's write-ups of other models, my advice would be to expect some aspects to vary a little bit, but the process should be fundamentally the same. I was pleasantly surprised that I didn't have to worry about fishing ribbon cable through the body of the camera like some of the older models required.
It's definite intimidating to crack your camera open, but in retrospect, the process really is quite painless.
Wow! What can I say but "Thank You". I would never have attempted this without your article. In fact everybody I talked to told me I was crazy to try. I just took it slow and everything went pretty smooth.
We had the camera maybe 5 months and were on a trip to Disney. I was carrying it in my pocket, pulling it out to snap pictures, when one time I pulled it out, the screen was distotred and the camera turned itself off. I first thought the battery had died. Turns out I had somehow broken the LCD while in my pocket.
I mean that was why we liked the thing in the first place, was that it would fit into a pocket. Well we never could get it to come back on, and ended up buying some old 35mm throwaway cameras.
Cannon wanted approx. $150 to repair the LCD. I just couldn't bring myself to spend the money and was poking around and found your blog.
Anyway, for $50 plus shipping, It is now good as new.
Thanks again, Teege
I just bought one of these cameras that had been dropped and the lens barrel is jammed. Any comments/tips on fixing this given you had the camera mostly apart?
Teege: Glad everything worked for you!
Anonymous: I don't have any advice about the lens barrel that I'd really be confident about. Popping open the case would help you determine if it's jammed on something in the housing or not, as you should be able to keep it powered up with the front cover off.
hi.
when i finished the reassembly of the camera i found a strange bar that i dont know where it came from and where it belong
can you help???
Great info! Thank You, I'm trying to repair my lens barrel also, I just got it apart so I'll let you know how far I get. Also a small metal bar just dropped out of the back of the camera, no idea where it goes.
for a cheap shop fix Google Darn Toothy Sam, they evidently can supply parts for what looks like decent prices?
Okay, I had no luck with the lens barrel, but that metal bar with the notches and bent ends goes on the right side of the LCD screen when looking at the back of the camera. it will make a tight fit in this configuration ] and the two notches will fit over a small ribbon and a small platic piece. sorry I dont have any pictures...my camera is in pieces. ;)
my lens barrel also got some demaged and the camera gave me the lens errow message(restart....) after i disassembeled and play with the lens and then reassemble it back the camera stop to respond at all. any suggestions??????
Regarding the small bar with the notches and bent ends, yes, that goes on the right hand side of the LCD. You can see it in the correct position in one of the pictures.
For the issues people have been having with the lens barrel, I'm afraid I don't have any advice to offer.
Excellent information, I wish we were able to provide instructions for the 1000s of parts we sell and were able to reach more people than we already do with this sort of information as you are doing because THIS is exactly what people need to know!
People need to STOP telling others 'oh no you can't repair that yourself or it's too expensive just throw it away and buy another one.'
If we can help with a digital camera part or repair a digital camera for you please let us know, at www.Darntoothysam.com.
As for the lens issues, you will most likely need to replace the lens (we have them for cheap); and the camera that is not responding after opening it, if you mean there is no power then you have shorted out the fuse or damaged a ribbon cable or similar.
Thomas
Thank You so much,
After reading your post , I decided to get a replacement LCD ,
It took some time to ship it to ISRAEL,
When I got it it didn't take long to replace having your instructions.
NOTE : I think that my LCD broke because of a bad Wrist Strap design (by canon) , it has a plastic that is used to tighten the wrist strap to your arm, but when you put your camera in a bag or in your pocket , it can crack the LCD, i mention it since after the repair I also removed this plastic. I recommend it to all SD850IS owners.
Thanks for the post, was definitely helpful and saved me nearly $100 by not paying someone to fix the camera for me!
Thanks for the steps to disassemble a Canon Powershot SD850 IS.
I did not need to replace the screen, but I had a lens error and the lens would not retract. So, I opened the case and poked around. I was unable to find access to the gears but I must have dislodged the debris because when I put the battery back in, the lens retracted and the camera worked fine.
FYI, we caused the lens error by spilling milk on the lens.
Rich N
Thanks, I really appreciate this. I followed your instructions for my SD700 and got it working fine. Only difference is, screen and backlight are separate components, but this last step wasn't too hard to figure out.
stuck lens problem: lots of write ups about this. basically, if the lens is centered in the face, just whack it hard on the side with the usb connector while turning it on. it didn't work the first few times i did it, but after a few more really hard whacks against my hand it started working and has worked ever since. if the lens is not centered, gently push, pull, twist while turning it on, snaps into place. from what i read, it's about 50% successful. or, complete lens replacement for about $50 on ebay.
Thanks for the article! It gave me confidence to try it myself. Cost me a total of $25 for my Powershot SD1000. Thanks a lot!
So, did this on an SD700. Replaced backlight only. One thing to note. I could not for the life of me "unclip" the ribbon connector for the narrow backlight ribbon...got a little rough with it and gave up. Instead i was able to pull the old ribbon out, and push the new one in with a pair of needle nose. It seems to be secure, and as far in as before. Not sure if the SD700 is supposed to unclip like the SD850, but i couldn't do it, and this route worked fine.
quite a difficult procedure, we have had two cameras need this sortof work, canons, but not not top end, it was a case of buy a new one or nothing.
I ordered a replacement LCD from a DIY parts house on eBay (located in SC), received it and installed it according to their slide presentation. Two months later, one burn spot appeared on the LCD and shortly thereafter another. They apparently get cheap LCDs from China.
Once you've got the back cover off, you'll have access to the LCD. There are three screws to remove in order to take out the retaining clip. The one in the top left was extremely hard to remove, as the head was very shallow.
Great instructions! I have it apart. Now how do I remove the lens barrel? After being dropped, lens won't retract. factory wants $130 to repair.
Also, any idea why these cameras are selling for $600 now? Paid $270 in 2008. Must be a good camera.
Thanks for the tips! Like you said, I am having a very hard time removing the last two screws to get the back panel off. The one on top is very shallow, and the one on the side just won't turn. It's almost stripped. :-( I can't get enough torque. Any tips on removing both of them?
I have an 850is and the lens was actually jammed inside and would not extend. After most of the camera apart I eventually took a small flathead screw driver underneath the lens guard and forced the lens to extend out. Camera works like beautifully now.
iam having a hard time putting back the big ribbon on my sd850 is. there seems to be no clip to lift so i could put it in place to lock it in.
Hey John,
Thanks for writing this up and taking the time to include pictures. The navigation pad on my girlfriend's camera was stuck so I used your guide to open it up and readjust the pad.
Holy cow, thanks so much for this guide! While cleaning the battery terminal pins, I accidentally pushed one of them down flat. Following your instructions, I was able to get the cover off and lift out the circuit board enough to slip a needle back there to bend the pin back into shape.
Post a Comment
Subscribe to Post Comments [Atom]
<< Home